m (→Chests) |
m (→Consumables) |
||
| (47 intermediate revisions by the same user not shown) | |||
| Line 2: | Line 2: | ||
Players have access to a variety of '''equipment''' during a match. |
Players have access to a variety of '''equipment''' during a match. |
||
| − | Equipment augments a player's offense, defense and movement via Amulets, Belts and Boots respectively. |
+ | Equipment augments a player's offense, defense and movement via Amulets, Belts and Boots respectively. (Or their [[Equipment#The Merchant|Blessings]] counterpart) |
[[Equipment#Runes|Runes]] however, grant access to a third activated ability which primarily provides high mobility on a cooldown. |
[[Equipment#Runes|Runes]] however, grant access to a third activated ability which primarily provides high mobility on a cooldown. |
||
| Line 18: | Line 18: | ||
Equipment comes in 5 different tiers of rarity; {{Rarity|Common}}, {{Rarity|Uncommon}}, {{Rarity|Rare}}, {{Rarity|Epic}} and {{Rarity|Legendary}}. |
Equipment comes in 5 different tiers of rarity; {{Rarity|Common}}, {{Rarity|Uncommon}}, {{Rarity|Rare}}, {{Rarity|Epic}} and {{Rarity|Legendary}}. |
||
| − | {{Rarity|Common}} & {{Rarity|Uncommon}} rarities of [[Spells & Sorceries#Gauntlets|Gauntlets]] & other equipment can be found all across the [[Spellbreak Lore|Hollow Lands]]. |
+ | In [[Game Modes|Battle Royale]], {{Rarity|Common}} & {{Rarity|Uncommon}} rarities of [[Spells & Sorceries#Gauntlets|Gauntlets]] & other equipment can be found all across the [[Spellbreak Lore|Hollow Lands]]. |
Higher rarities however are limited to Chests, with {{Rarity|Legendary}} rarity being exclusive to [[File:Mana_Vault_New.png|25x25px]] Mana Vaults. |
Higher rarities however are limited to Chests, with {{Rarity|Legendary}} rarity being exclusive to [[File:Mana_Vault_New.png|25x25px]] Mana Vaults. |
||
| − | [[File:Mana_Vault_New.png|25x25px]] Mana Vaults spawn randomly across the map at match start and are indicated by the following icon: [[File: |
+ | [[File:Mana_Vault_New.png|25x25px]] Mana Vaults spawn randomly across the map at match start and are indicated by the following icon: [[File:Mana_Vault_Icon_New.png|25x25px]] |
Additional [[File:Mana_Vault_New.png|25x25px]] Mana Vaults will spawn within a safe zone each time the [[Spellstorm]] fully encloses it. |
Additional [[File:Mana_Vault_New.png|25x25px]] Mana Vaults will spawn within a safe zone each time the [[Spellstorm]] fully encloses it. |
||
| Line 28: | Line 28: | ||
Once activated, the vault will begin assembling over 20 seconds before opening. The assembly is audible to nearby players. |
Once activated, the vault will begin assembling over 20 seconds before opening. The assembly is audible to nearby players. |
||
| + | Since week 4 of [[Chapter 2]], opening [[File:Epic Chest New.png|25x25px|link=Equipment#Chests]] Epic Chests and [[File:Mana_Vault_New.png|25x25px|link=Equipment#Chests]] Mana Vaults will trigger an ambush of hostile NPC Breakers. |
||
| − | Worth of note are the new [[Elemental Shrines]], which store a {{Rarity|Rare}} [[Spells & Sorceries#Gauntlets|Gauntlet]] corresponding to the shrine's [[elements|element]].'' |
||
{| class="wikitable sbtable2" style="border: 2px solid black;" |
{| class="wikitable sbtable2" style="border: 2px solid black;" |
||
! colspan="3" style="background: linear-gradient(to right, rgba(246, 189, 104, 0.8), rgba(246, 189, 104, 0.67), rgba(246, 189, 104, 0.55), rgba(246, 189, 104, 0.45), rgba(246, 189, 104, 0.55), rgba(246, 189, 104, 0.67), rgba(246, 189, 104, 0.8))"|<span style="font-size: 120%">Chests</span> |
! colspan="3" style="background: linear-gradient(to right, rgba(246, 189, 104, 0.8), rgba(246, 189, 104, 0.67), rgba(246, 189, 104, 0.55), rgba(246, 189, 104, 0.45), rgba(246, 189, 104, 0.55), rgba(246, 189, 104, 0.67), rgba(246, 189, 104, 0.8))"|<span style="font-size: 120%">Chests</span> |
||
|- |
|- |
||
| − | ! style="background: rgba(246, 189, 104, 0.30);border-top: 2px solid black; |
+ | ! style="background: rgba(246, 189, 104, 0.30);border-top: 2px solid black;" | Icon |
! style="background: rgba(246, 189, 104, 0.30);border: 2px solid black;" | Name |
! style="background: rgba(246, 189, 104, 0.30);border: 2px solid black;" | Name |
||
! style="background: rgba(246, 189, 104, 0.30);border-top: 2px solid black;" | Loot |
! style="background: rgba(246, 189, 104, 0.30);border-top: 2px solid black;" | Loot |
||
|- |
|- |
||
| − | | style="background: rgba(255, 255, 255, 0.78); border-top: 2px solid black; height: 73px"| [[File:Rune_Chest_New.png| |
+ | | style="background: rgba(255, 255, 255, 0.78); border-top: 2px solid black; height: 73px; vertical-align: middle"| [[File:Rune_Chest_New.png|52x52px]] |
| style="background: rgba(255, 255, 255, 0.78); border: 2px solid black; vertical-align: middle"|<center>Small Chest</center> |
| style="background: rgba(255, 255, 255, 0.78); border: 2px solid black; vertical-align: middle"|<center>Small Chest</center> |
||
| style="background: rgba(255, 255, 255, 0.78); border-top: 2px solid black; vertical-align: middle"| |
| style="background: rgba(255, 255, 255, 0.78); border-top: 2px solid black; vertical-align: middle"| |
||
| Line 43: | Line 43: | ||
*Small chance of one random [[Scroll]]. |
*Small chance of one random [[Scroll]]. |
||
|- |
|- |
||
| − | | style="background: rgba(255, 255, 255, 0.78); border-top: 2px solid black;"| [[File:Item_Chest_New.png| |
+ | | style="background: rgba(255, 255, 255, 0.78); border-top: 2px solid black; vertical-align: middle"| [[File:Item_Chest_New.png|52x52px]] |
| style="background: rgba(255, 255, 255, 0.78); border: 2px solid black; vertical-align: middle"|<center>Medium Chest</center> |
| style="background: rgba(255, 255, 255, 0.78); border: 2px solid black; vertical-align: middle"|<center>Medium Chest</center> |
||
| style="background: rgba(255, 255, 255, 0.78); border-top: 2px solid black;"| |
| style="background: rgba(255, 255, 255, 0.78); border-top: 2px solid black;"| |
||
| Line 50: | Line 50: | ||
* Small chance of one random [[Scroll]]. |
* Small chance of one random [[Scroll]]. |
||
|- |
|- |
||
| − | | style="background: rgba(255, 255, 255, 0.78); border-top: 2px solid black;"| [[File:Gauntlet_Chest_New.png| |
+ | | style="background: rgba(255, 255, 255, 0.78); border-top: 2px solid black; vertical-align: middle"| [[File:Gauntlet_Chest_New.png|52x52px]] |
| style="background: rgba(255, 255, 255, 0.78); border: 2px solid black; vertical-align: middle"|<center>Large Chest</center> |
| style="background: rgba(255, 255, 255, 0.78); border: 2px solid black; vertical-align: middle"|<center>Large Chest</center> |
||
| style="background: rgba(255, 255, 255, 0.78); border-top: 2px solid black;"| |
| style="background: rgba(255, 255, 255, 0.78); border-top: 2px solid black;"| |
||
| Line 57: | Line 57: | ||
*Small chance of one random [[Scroll]]. |
*Small chance of one random [[Scroll]]. |
||
|- |
|- |
||
| − | | style="background: rgba(187, 153, 255, 0.78); border-top: 2px solid black; height: 73px"| [[File:Epic_Chest_New.png| |
+ | | style="background: rgba(187, 153, 255, 0.78); border-top: 2px solid black; height: 73px; vertical-align: middle"| [[File:Epic_Chest_New.png|52x52px|link=Epic Chest Map]] |
| style="background: rgba(187, 153, 255, 0.78); border: 2px solid black; vertical-align: middle"|<center>Epic Chest</center> |
| style="background: rgba(187, 153, 255, 0.78); border: 2px solid black; vertical-align: middle"|<center>Epic Chest</center> |
||
| style="background: rgba(187, 153, 255, 0.78); border-top: 2px solid black;"| |
| style="background: rgba(187, 153, 255, 0.78); border-top: 2px solid black;"| |
||
| Line 63: | Line 63: | ||
* One random [[Scroll]]. |
* One random [[Scroll]]. |
||
|- |
|- |
||
| − | | style="background: rgba(255, 165, 0, 0.78); border-top: 2px solid black; border-right: 2px solid black;"| [[File:Mana_Vault_New.png| |
+ | | style="background: rgba(255, 165, 0, 0.78); border-top: 2px solid black; border-right: 2px solid black; vertical-align: middle"| [[File:Mana_Vault_New.png|52x52px]] |
| style="background: rgba(255, 165, 0, 0.78); border-top: 2px solid black; border-left: 2px solid black; border-right: 2px solid black; vertical-align: middle"|<center>Mana Vault</center> |
| style="background: rgba(255, 165, 0, 0.78); border-top: 2px solid black; border-left: 2px solid black; border-right: 2px solid black; vertical-align: middle"|<center>Mana Vault</center> |
||
| style="background: rgba(255, 165, 0, 0.78); border-top: 2px solid black;"| |
| style="background: rgba(255, 165, 0, 0.78); border-top: 2px solid black;"| |
||
| Line 82: | Line 82: | ||
==Amulets, Belts & Boots== |
==Amulets, Belts & Boots== |
||
| + | Players start the game with baseline stat values that vary based on game mode (Battle Royale / Dominion): |
||
| − | Players start the game with a baseline max health value of '''100''', a max armor value of '''0''', a max [[mana]] value of '''50''' and a Run Speed value of [https://www.reddit.com/r/Spellbreak/comments/jhq76u/trying_to_determine_the_base_run_speed_in/ <span style="color:black">'''21.5'''.</span>] |
||
| + | <div id="mf-banner">Max Health: '''100''' | Max Armor: '''0'''<br>Max [[Mana]]: '''50 / 70''' | Run Speed: [https://www.reddit.com/r/Spellbreak/comments/jhq76u/trying_to_determine_the_base_run_speed_in/ <span style="color:black">'''21.5 / 24.5'''</span>]</div><div class="nomobile">Max Health: '''100''' | Max Armor: '''0''' | Max [[Mana]]: '''50 / 70''' | Run Speed: [https://www.reddit.com/r/Spellbreak/comments/jhq76u/trying_to_determine_the_base_run_speed_in/ <span style="color:black">'''21.5 / 24.5'''</span>]</div> |
||
| ⚫ | |||
| ⚫ | |||
| − | During week 12 of [[Chapters/Chapter_1:_The_Spellstorm|Chapter 1]], [[Aegis Towers]] have begun gathering power from the [[Storm]]. This [[Aegis Towers|power]] may be absorbed to further increase one's stats. |
||
{|class="wikitable sbtable2" style="text-align: center" |
{|class="wikitable sbtable2" style="text-align: center" |
||
| Line 128: | Line 128: | ||
|} |
|} |
||
| + | ==The Merchant== |
||
| + | {{#lsth:Game Modes|The Merchant}} |
||
==Runes== |
==Runes== |
||
| Line 134: | Line 136: | ||
Players have a max rune charge of 1 by default, and will refill a charge once the cooldown timer completes. The cooldown timer is paused while [[Hover|hovering]]. |
Players have a max rune charge of 1 by default, and will refill a charge once the cooldown timer completes. The cooldown timer is paused while [[Hover|hovering]]. |
||
| − | Additionally, rune charges can only refill after use once the player has touched the ground or used {{TextLink|Icon=Tempest |
+ | Additionally, rune charges can only refill after use once the player has touched the ground or used {{TextLink|Icon=Tempest Skill1.png|Color=#e6deb2|Shadow=0.20em|Text=Wind Surge}}, {{TextLink|Icon=Pyromancer Skill2.png|Color=#E86B34|Text=Firefly}} or {{TextLink|Icon=Toxicologist Skill2.png|Color=#2a911f|Text=Vanishing Mists}}. |
{| class="wikitable sbtable2" style="border: 2px solid black" |
{| class="wikitable sbtable2" style="border: 2px solid black" |
||
! colspan="9" style="background: linear-gradient(to right, rgba(246, 189, 104, 0.8), rgba(246, 189, 104, 0.67), rgba(246, 189, 104, 0.55), rgba(246, 189, 104, 0.45), rgba(246, 189, 104, 0.55), rgba(246, 189, 104, 0.67), rgba(246, 189, 104, 0.8))" |<span style="font-size: 120%">Runes</span> |
! colspan="9" style="background: linear-gradient(to right, rgba(246, 189, 104, 0.8), rgba(246, 189, 104, 0.67), rgba(246, 189, 104, 0.55), rgba(246, 189, 104, 0.45), rgba(246, 189, 104, 0.55), rgba(246, 189, 104, 0.67), rgba(246, 189, 104, 0.8))" |<span style="font-size: 120%">Runes</span> |
||
|- |
|- |
||
| − | ! style="background: rgba(246, 189, 104, 0.30);border: 2px solid black; min-width: |
+ | !<div id="mf-banner"> style="background-color: rgba(246, 189, 104, 0.30); border: 2px solid black; min-width:90px" | Icon</div> |
| + | !<div class="nomobile"> style="background-color: rgba(246, 189, 104, 0.30); border: 2px solid black" | Icon</div> |
||
! style="background: rgba(246, 189, 104, 0.30);border: 2px solid black;" | Name |
! style="background: rgba(246, 189, 104, 0.30);border: 2px solid black;" | Name |
||
! style="background: rgba(246, 189, 104, 0.30);border: 2px solid black; min-width:24.5em" | Description |
! style="background: rgba(246, 189, 104, 0.30);border: 2px solid black; min-width:24.5em" | Description |
||
| Line 178: | Line 181: | ||
| style="background: rgba(246, 189, 104, 0.10); border: 2px solid black; vertical-align: middle" |<center>Shadowstep Rune</center> |
| style="background: rgba(246, 189, 104, 0.10); border: 2px solid black; vertical-align: middle" |<center>Shadowstep Rune</center> |
||
| style="background: rgba(246, 189, 104, 0.10); border: 2px solid black; vertical-align: middle" | Become [[Invisibility|<span style="color:black;">'''Invisible'''</span>]] for a duration and quickly dash in the direction you're moving. |
| style="background: rgba(246, 189, 104, 0.10); border: 2px solid black; vertical-align: middle" | Become [[Invisibility|<span style="color:black;">'''Invisible'''</span>]] for a duration and quickly dash in the direction you're moving. |
||
| − | | style="background: rgba(246, 189, 104, 0.10); border: 2px solid black; vertical-align: middle" |<center> |
+ | | style="background: rgba(246, 189, 104, 0.10); border: 2px solid black; vertical-align: middle" |<center>1 s</center> |
| style="background: rgba(255, 255, 255, 0.78); border: 2px solid black; vertical-align: middle" | <center>13 s</center> |
| style="background: rgba(255, 255, 255, 0.78); border: 2px solid black; vertical-align: middle" | <center>13 s</center> |
||
| style="background: rgba(153, 255, 102, 0.78); border: 2px solid black; vertical-align: middle" | <center>10 s</center> |
| style="background: rgba(153, 255, 102, 0.78); border: 2px solid black; vertical-align: middle" | <center>10 s</center> |
||
| Line 197: | Line 200: | ||
| style="background: rgba(246, 189, 104, 0.10); border: 2px solid black; vertical-align: middle" |[[File:Featherfall Rune.png|center|60x60px]] |
| style="background: rgba(246, 189, 104, 0.10); border: 2px solid black; vertical-align: middle" |[[File:Featherfall Rune.png|center|60x60px]] |
||
| style="background: rgba(246, 189, 104, 0.10); border: 2px solid black; vertical-align: middle" |<center> Featherfall Rune</center> |
| style="background: rgba(246, 189, 104, 0.10); border: 2px solid black; vertical-align: middle" |<center> Featherfall Rune</center> |
||
| − | | style="background: rgba(246, 189, 104, 0.10); border: 2px solid black; vertical-align: middle" | Launch high up into the air, then slowly descend down for a duration.<br>Casting ends the descent. You must be grounded to |
+ | | style="background: rgba(246, 189, 104, 0.10); border: 2px solid black; vertical-align: middle" | Launch high up into the air, then slowly descend down for a duration.<br>Casting ends the descent. You must be grounded to use multiple charges. |
| style="background: rgba(246, 189, 104, 0.10); border: 2px solid black; vertical-align: middle" |<center>3.7 s</center> |
| style="background: rgba(246, 189, 104, 0.10); border: 2px solid black; vertical-align: middle" |<center>3.7 s</center> |
||
| − | | style="background: rgba(255, 255, 255, 0.78); border: 2px solid black; vertical-align: middle" | <center> |
+ | | style="background: rgba(255, 255, 255, 0.78); border: 2px solid black; vertical-align: middle" | <center>16 s</center> |
| − | | style="background: rgba(153, 255, 102, 0.78); border: 2px solid black; vertical-align: middle" | <center> |
+ | | style="background: rgba(153, 255, 102, 0.78); border: 2px solid black; vertical-align: middle" | <center>13 s</center> |
| − | | style="background: rgba(96, 177, 255, 0.78); border: 2px solid black; vertical-align: middle" | <center> |
+ | | style="background: rgba(96, 177, 255, 0.78); border: 2px solid black; vertical-align: middle" | <center>12 s</center> |
| − | | style="background: rgba(187, 153, 255, 0.78); border: 2px solid black; vertical-align: middle" | <center> |
+ | | style="background: rgba(187, 153, 255, 0.78); border: 2px solid black; vertical-align: middle" | <center>11 s</center> |
| − | | style="background: rgba(255, 180, 40, 0.78); border-top: 2px solid black; vertical-align: middle" | <center> |
+ | | style="background: rgba(255, 180, 40, 0.78); border-top: 2px solid black; vertical-align: middle" | <center>10 s</center> |
|- |
|- |
||
| style="background: rgba(246, 189, 104, 0.10); border: 2px solid black; vertical-align: middle" |[[File:Flight Rune.png|center|60x60px]] |
| style="background: rgba(246, 189, 104, 0.10); border: 2px solid black; vertical-align: middle" |[[File:Flight Rune.png|center|60x60px]] |
||
| style="background: rgba(246, 189, 104, 0.10); border: 2px solid black; vertical-align: middle" |<center>Flight Rune</center> |
| style="background: rgba(246, 189, 104, 0.10); border: 2px solid black; vertical-align: middle" |<center>Flight Rune</center> |
||
| − | | style="background: rgba(246, 189, 104, 0.10); border: 2px solid black; vertical-align: middle" | Take flight for a duration. Is interrupted by collision or jumping. |
+ | | style="background: rgba(246, 189, 104, 0.10); border: 2px solid black; vertical-align: middle" | Take flight for a duration. Vertical flight speed is reduced by 40%.<br>Is interrupted by collision or jumping. You must be grounded to use multiple charges. |
| − | | style="background: rgba(246, 189, 104, 0.10); border: 2px solid black; vertical-align: middle" |<center>5 s</center> |
+ | | style="background: rgba(246, 189, 104, 0.10); border: 2px solid black; vertical-align: middle" |<center>3.5 s</center> |
| style="background: rgba(255, 255, 255, 0.78); border: 2px solid black; vertical-align: middle" | <center>18 s</center> |
| style="background: rgba(255, 255, 255, 0.78); border: 2px solid black; vertical-align: middle" | <center>18 s</center> |
||
| style="background: rgba(153, 255, 102, 0.78); border: 2px solid black; vertical-align: middle" | <center>15 s</center> |
| style="background: rgba(153, 255, 102, 0.78); border: 2px solid black; vertical-align: middle" | <center>15 s</center> |
||
| Line 217: | Line 220: | ||
| style="background: rgba(246, 189, 104, 0.10); border: 2px solid black; vertical-align: middle" |[[File:Teleport Rune.png|center|60x60px]] |
| style="background: rgba(246, 189, 104, 0.10); border: 2px solid black; vertical-align: middle" |[[File:Teleport Rune.png|center|60x60px]] |
||
| style="background: rgba(246, 189, 104, 0.10); border: 2px solid black; vertical-align: middle" |<center>Teleportation Rune</center> |
| style="background: rgba(246, 189, 104, 0.10); border: 2px solid black; vertical-align: middle" |<center>Teleportation Rune</center> |
||
| − | | style="background: rgba(246, 189, 104, 0.10); border: 2px solid black; vertical-align: middle" | Teleport to target location after a short channel duration. (60 m) |
+ | | style="background: rgba(246, 189, 104, 0.10); border: 2px solid black; vertical-align: middle" | Teleport to target location after a short channel duration. Can move during channel. (60 m) |
| − | | style="background: rgba(246, 189, 104, 0.10); border: 2px solid black; vertical-align: middle" |<center> |
+ | | style="background: rgba(246, 189, 104, 0.10); border: 2px solid black; vertical-align: middle" |<center>1 s</center> |
| − | | style="background: rgba(255, 255, 255, 0.78); border: 2px solid black; vertical-align: middle" | <center> |
+ | | style="background: rgba(255, 255, 255, 0.78); border: 2px solid black; vertical-align: middle" | <center>20 s</center> |
| − | | style="background: rgba(153, 255, 102, 0.78); border: 2px solid black; vertical-align: middle" | <center> |
+ | | style="background: rgba(153, 255, 102, 0.78); border: 2px solid black; vertical-align: middle" | <center>16 s</center> |
| − | | style="background: rgba(96, 177, 255, 0.78); border: 2px solid black; vertical-align: middle" | <center> |
+ | | style="background: rgba(96, 177, 255, 0.78); border: 2px solid black; vertical-align: middle" | <center>13 s</center> |
| − | | style="background: rgba(187, 153, 255, 0.78); border: 2px solid black; vertical-align: middle" | <center> |
+ | | style="background: rgba(187, 153, 255, 0.78); border: 2px solid black; vertical-align: middle" | <center>12 s</center> |
| − | | style="background: rgba(255, 180, 40, 0.78); border-top: 2px solid black; vertical-align: middle" | <center> |
+ | | style="background: rgba(255, 180, 40, 0.78); border-top: 2px solid black; vertical-align: middle" | <center>11 s</center> |
|- |
|- |
||
| style="background: rgba(246, 189, 104, 0.10); border-left: 2px solid black; vertical-align: middle" |[[File:Chronomaster Rune.png|center|60x60px]] |
| style="background: rgba(246, 189, 104, 0.10); border-left: 2px solid black; vertical-align: middle" |[[File:Chronomaster Rune.png|center|60x60px]] |
||
| style="background: rgba(246, 189, 104, 0.10); border-left: 2px solid black; vertical-align: middle" |<center>Chronomaster Rune</center> |
| style="background: rgba(246, 189, 104, 0.10); border-left: 2px solid black; vertical-align: middle" |<center>Chronomaster Rune</center> |
||
| − | | style="background: rgba(246, 189, 104, 0.10); border-left: 2px solid black; vertical-align: middle" | Upon activation, place a ghost of your former self at your position.<br> 4 seconds after activation, quickly [[Status Effects#Mobility|rewind]] back in time to the ghost's position.<br>Your health & armor are returned to the highest value recorded in the time frame.<br><br>You will not rewind if you become [[Disruption|disrupted]] during activation.<br>During the [[Status Effects#Mobility|rewind]] you are [[Status Effects#Buffs & Debuffs|immune]], truly invisible and cleansed of all [[Status Effects]].<br>You must be grounded to |
+ | | style="background: rgba(246, 189, 104, 0.10); border-left: 2px solid black; vertical-align: middle" | Upon activation, place a ghost of your former self at your position.<br> 4 seconds after activation, quickly [[Status Effects#Mobility|rewind]] back in time to the ghost's position.<br>Your health & armor are returned to the highest value recorded in the time frame.<br><br>You will not rewind if you become [[Disruption|disrupted]] during activation.<br>During the [[Status Effects#Mobility|rewind]] you are [[Status Effects#Buffs & Debuffs|immune]], truly invisible and cleansed of all [[Status Effects]].<br>You must be grounded to use multiple charges. |
| style="background: rgba(246, 189, 104, 0.10); border-left: 2px solid black; vertical-align: middle" |<center>4 s</center> |
| style="background: rgba(246, 189, 104, 0.10); border-left: 2px solid black; vertical-align: middle" |<center>4 s</center> |
||
| − | | style="background: rgba(255, 255, 255, 0.78); border-left: 2px solid black; vertical-align: middle" | <center> |
+ | | style="background: rgba(255, 255, 255, 0.78); border-left: 2px solid black; vertical-align: middle" | <center>17 s</center> |
| − | | style="background: rgba(153, 255, 102, 0.78); border-left: 2px solid black; vertical-align: middle" | <center> |
+ | | style="background: rgba(153, 255, 102, 0.78); border-left: 2px solid black; vertical-align: middle" | <center>13 s</center> |
| − | | style="background: rgba(96, 177, 255, 0.78); border-left: 2px solid black; vertical-align: middle" | <center> |
+ | | style="background: rgba(96, 177, 255, 0.78); border-left: 2px solid black; vertical-align: middle" | <center>11 s</center> |
| − | | style="background: rgba(187, 153, 255, 0.78); border-left: 2px solid black; vertical-align: middle" | <center> |
+ | | style="background: rgba(187, 153, 255, 0.78); border-left: 2px solid black; vertical-align: middle" | <center>9 s</center> |
| − | | style="background: rgba(255, 180, 40, 0.78); border-left: 2px solid black; border-top: 2px solid black; vertical-align: middle" | <center> |
+ | | style="background: rgba(255, 180, 40, 0.78); border-left: 2px solid black; border-top: 2px solid black; vertical-align: middle" | <center>8 s</center> |
|} |
|} |
||
==Consumables== |
==Consumables== |
||
| − | <!--DESKTOP Image--><div class="nomobile">[[File:21.jpg|thumb| |
+ | <!--DESKTOP Image--><div class="nomobile" style="float:right">[[File:21.jpg|thumb|258px|<center>'''Armor Shard Being Consumed'''</center>]]</div> |
<!--MOBILE Image--><div id="mf-banner">[[File:21.jpg|thumb|400px|<center>'''Armor Shard Being Consumed'''</center>]]</div> |
<!--MOBILE Image--><div id="mf-banner">[[File:21.jpg|thumb|400px|<center>'''Armor Shard Being Consumed'''</center>]]</div> |
||
| − | Consumables grant the user a temporary regenerative buff or power-up after a short [[Status Effects#Channels|channel]]. |
+ | Consumables grant the user a temporary regenerative buff or power-up after a short [[Status Effects#Channels|channel]]. Most consumables can be stacked in the same inventory slot. |
Run Speed is reduced while channeling, but the player can crouch and remain [[Invisibility|<span style="text-shadow: 0.03em 0.03em 0em black"><span style="color:black">'''Invisible'''</span></span>]] during it. For more info see [[Status_Effects#Channels|Channels]]. |
Run Speed is reduced while channeling, but the player can crouch and remain [[Invisibility|<span style="text-shadow: 0.03em 0.03em 0em black"><span style="color:black">'''Invisible'''</span></span>]] during it. For more info see [[Status_Effects#Channels|Channels]]. |
||
| − | They can be found throughout the [[Spellbreak Lore|Hollow Lands]] and |
+ | They can be found throughout the [[Spellbreak Lore|Hollow Lands]] and drop from [[Game Modes#The Vowguard|Vowguard NPCs]]. |
{| class="wikitable sbtable" style="border: 2px solid black" |
{| class="wikitable sbtable" style="border: 2px solid black" |
||
| Line 249: | Line 252: | ||
! colspan=7 style="background: linear-gradient(to right, rgba(246, 189, 104, 0.8), rgba(246, 189, 104, 0.67), rgba(246, 189, 104, 0.55), rgba(246, 189, 104, 0.45), rgba(246, 189, 104, 0.55), rgba(246, 189, 104, 0.67), rgba(246, 189, 104, 0.8))"|<span style="font-size: 120%">Consumables</span> |
! colspan=7 style="background: linear-gradient(to right, rgba(246, 189, 104, 0.8), rgba(246, 189, 104, 0.67), rgba(246, 189, 104, 0.55), rgba(246, 189, 104, 0.45), rgba(246, 189, 104, 0.55), rgba(246, 189, 104, 0.67), rgba(246, 189, 104, 0.8))"|<span style="font-size: 120%">Consumables</span> |
||
|- |
|- |
||
| − | ! style="border: 2px solid black; background-color: rgba(246, 189, 104, 0.30); min-width: |
+ | !<div id="mf-banner"> style="border: 2px solid black; background-color: rgba(246, 189, 104, 0.30); vertical-align: middle; min-width:80px" | Icon</div> |
| − | ! style="border: 2px solid black; background-color: rgba(246, 189, 104, 0.30)" | |
+ | !<div class="nomobile"> style="border: 2px solid black; background-color: rgba(246, 189, 104, 0.30); vertical-align: middle" | Icon</div> |
| − | ! style="border: 2px solid black; background-color: rgba(246, 189, 104, 0.30)" | |
+ | ! style="border: 2px solid black; background-color: rgba(246, 189, 104, 0.30); vertical-align: middle" | Name |
| − | ! style="border: 2px solid black; background-color: rgba(246, 189, 104, 0.30)" | |
+ | ! style="border: 2px solid black; background-color: rgba(246, 189, 104, 0.30); vertical-align: middle" | Rarity |
| − | ! style="border |
+ | ! style="border: 2px solid black; background-color: rgba(246, 189, 104, 0.30); vertical-align: middle" | Max Stack |
| + | ! style="border-left: 2px solid black; border-top: 2px solid black; background-color: rgba(246, 189, 104, 0.30); min-width: 18.5em; vertical-align: middle" | Description |
||
|- style="background-color: rgba(246, 189, 104, 0.10)" |
|- style="background-color: rgba(246, 189, 104, 0.10)" |
||
| − | | style="border: 2px solid black" | [[File:Small Health Potion.png|center| |
+ | | style="border: 2px solid black; vertical-align: middle" | [[File:Small Health Potion.png|center|52x52px]] || style="border: 2px solid black; vertical-align: middle" | Small Health Potion || style="border: 2px solid black; text-align:center; vertical-align: middle" | {{Rarity|Common}} || style="border: 2px solid black; text-align:center; vertical-align: middle" | 6 || style="border-left: 2px solid black; border-bottom: 2px solid black; border-top: 2px solid black; text-align:left; vertical-align: middle" | After drinking for 2 seconds, heals you for 15 health over 5 seconds. Drops in stacks of 2. |
|- style="background-color: rgba(246, 189, 104, 0.10)" |
|- style="background-color: rgba(246, 189, 104, 0.10)" |
||
| − | | style="border: 2px solid black" | [[File:Health Potion.png|center| |
+ | | style="border: 2px solid black; vertical-align: middle" | [[File:Health Potion.png|center|52x52px]] || style="border: 2px solid black; vertical-align: middle" | Health Potion || style="border: 2px solid black; text-align:center; vertical-align: middle" | {{Rarity|Uncommon}} || style="border: 2px solid black; text-align:center; vertical-align: middle" | 2 || style="border-left: 2px solid black; border-bottom: 2px solid black; border-top: 2px solid black; text-align:left; vertical-align: middle" | After drinking for 3 seconds, heals you for 25 health over 10 seconds. |
|- style="background-color: rgba(246, 189, 104, 0.10)" |
|- style="background-color: rgba(246, 189, 104, 0.10)" |
||
| − | | style="border: 2px solid black" | [[File:Large Health Potion.png|center| |
+ | | style="border: 2px solid black; vertical-align: middle" | [[File:Large Health Potion.png|center|52x52px]] || style="border: 2px solid black; vertical-align: middle" | Large Health Potion || style="border: 2px solid black; text-align:center; vertical-align: middle" | {{Rarity|Rare}} || style="border: 2px solid black; text-align:center; vertical-align: middle" | 2 || style="border-left: 2px solid black; border-bottom: 2px solid black; border-top: 2px solid black; text-align:left; vertical-align: middle" | After drinking for 6 seconds, heals you for 50 health over 10 seconds. |
|- style="background-color: rgba(246, 189, 104, 0.10)" |
|- style="background-color: rgba(246, 189, 104, 0.10)" |
||
| − | | style="border: 2px solid black" | [[File:Small Armor Shard.png|center| |
+ | | style="border: 2px solid black; vertical-align: middle" | [[File:Small Armor Shard.png|center|52x52px]] || style="border: 2px solid black; vertical-align: middle" | Small Armor Shard || style="border: 2px solid black; text-align:center; vertical-align: middle" | {{Rarity|Common}} || style="border: 2px solid black; text-align:center; vertical-align: middle" | 6 || style="border-left: 2px solid black; border-bottom: 2px solid black; border-top: 2px solid black; text-align:left; vertical-align: middle" | After consuming for 2 seconds, gives you 15 armor over 5 seconds. |
|- style="background-color: rgba(246, 189, 104, 0.10)" |
|- style="background-color: rgba(246, 189, 104, 0.10)" |
||
| − | | style="border: 2px solid black" | [[File:Armor Shard.png|center| |
+ | | style="border: 2px solid black; vertical-align: middle" | [[File:Armor Shard.png|center|52x52px]] || style="border: 2px solid black; vertical-align: middle" | Armor Shard || style="border: 2px solid black; text-align:center; vertical-align: middle" | {{Rarity|Uncommon}} || style="border: 2px solid black; text-align:center; vertical-align: middle" | 2 || style="border-left: 2px solid black; border-bottom: 2px solid black; border-top: 2px solid black; text-align:left; vertical-align: middle" | After consuming for 3 seconds, gives you 25 armor over 10 seconds. |
|- style="background-color: rgba(246, 189, 104, 0.10)" |
|- style="background-color: rgba(246, 189, 104, 0.10)" |
||
| − | | style="border: 2px solid black" | [[File:Large Armor_Shard.png|center| |
+ | | style="border: 2px solid black; vertical-align: middle" | [[File:Large Armor_Shard.png|center|52x52px]] || style="border: 2px solid black; vertical-align: middle" | Large Armor Shard || style="border: 2px solid black; text-align:center; vertical-align: middle" | {{Rarity|Rare}} || style="border: 2px solid black; text-align:center; vertical-align: middle" | 2 || style="border-left: 2px solid black; border-bottom: 2px solid black; border-top: 2px solid black; text-align:left; vertical-align: middle" | After consuming for 6 seconds, gives you 50 armor over 10 seconds. |
|- style="background-color: rgba(246, 189, 104, 0.10)" |
|- style="background-color: rgba(246, 189, 104, 0.10)" |
||
| − | | style="border: 2px solid black" | [[File:Safeguard Potion.png|center| |
+ | | style="border: 2px solid black; vertical-align: middle" | [[File:Safeguard Potion.png|center|52x52px]] || style="border: 2px solid black; vertical-align: middle" | Safeguard Potion || style="border: 2px solid black; text-align:center; vertical-align: middle" |{{Rarity|Epic}} || style="border: 2px solid black; text-align:center; vertical-align: middle" | 2 || style="border-left: 2px solid black; border-bottom: 2px solid black; border-top: 2px solid black; text-align:left; vertical-align: middle" | After drinking for 4 seconds, gives you 25 health and armor over 10 seconds. |
|- style="background-color: rgba(246, 189, 104, 0.10)" |
|- style="background-color: rgba(246, 189, 104, 0.10)" |
||
| − | | style="border: 2px solid black" | [[File:Large Safeguard Potion.png|center| |
+ | | style="border: 2px solid black; vertical-align: middle" | [[File:Large Safeguard Potion.png|center|52x52px]] || style="border: 2px solid black; vertical-align: middle" | Large Safeguard Potion || style="border: 2px solid black; text-align:center; vertical-align: middle" |{{Rarity|Legendary}} || style="border: 2px solid black; text-align:center; vertical-align: middle" | 1 || style="border-left: 2px solid black; border-bottom: 2px solid black; border-top: 2px solid black; text-align:left; vertical-align: middle" | After drinking for 6 seconds, gives you 50 health and armor over 10 seconds. |
|- style="background-color: rgba(246, 189, 104, 0.10)" |
|- style="background-color: rgba(246, 189, 104, 0.10)" |
||
| − | | style="border-left: 2px solid black; border-right: 2px solid black; border-top: 2px solid black" | [[File:Knowledge Potion.png|center| |
+ | | style="border-left: 2px solid black; border-right: 2px solid black; border-top: 2px solid black; vertical-align: middle" | [[File:Knowledge Potion.png|center|52x52px]] || style="border-left: 2px solid black; border-right: 2px solid black; border-top: 2px solid black; vertical-align: middle" | Knowledge Potion || style="border-left: 2px solid black; border-right: 2px solid black; border-top: 2px solid black; text-align:center; vertical-align: middle" | {{Rarity|Epic}} || style="border-left: 2px solid black; border-right: 2px solid black; border-top: 2px solid black; text-align:center; vertical-align: middle" | 1 || style="border-left: 2px solid black; border-top: 2px solid black; text-align: left" | After drinking for 3 seconds, gives you 2 bonus charges to your Rune and your Sorceries. |
|}{{NavBox}} |
|}{{NavBox}} |
||
[[Category:Spellbreak]] |
[[Category:Spellbreak]] |
||
Revision as of 19:00, 11 May 2021
Players have access to a variety of equipment during a match.
Equipment augments a player's offense, defense and movement via Amulets, Belts and Boots respectively. (Or their Blessings counterpart)
Runes however, grant access to a third activated ability which primarily provides high mobility on a cooldown.
A player can only equip one of each type of equipment, but may use the ping system to alert their squad of any excess loot they find.
In addition, they also have a hotbar with 4 inventory slots available to carry consumables in.
Storing Gauntlets & Runes in these slots requires the ![]() Spellslinger Talent.
Spellslinger Talent.
Upon being exiled, the player will drop everything in their equipment & inventory slots, as well as a random ![]() Scroll they have read.
Scroll they have read.
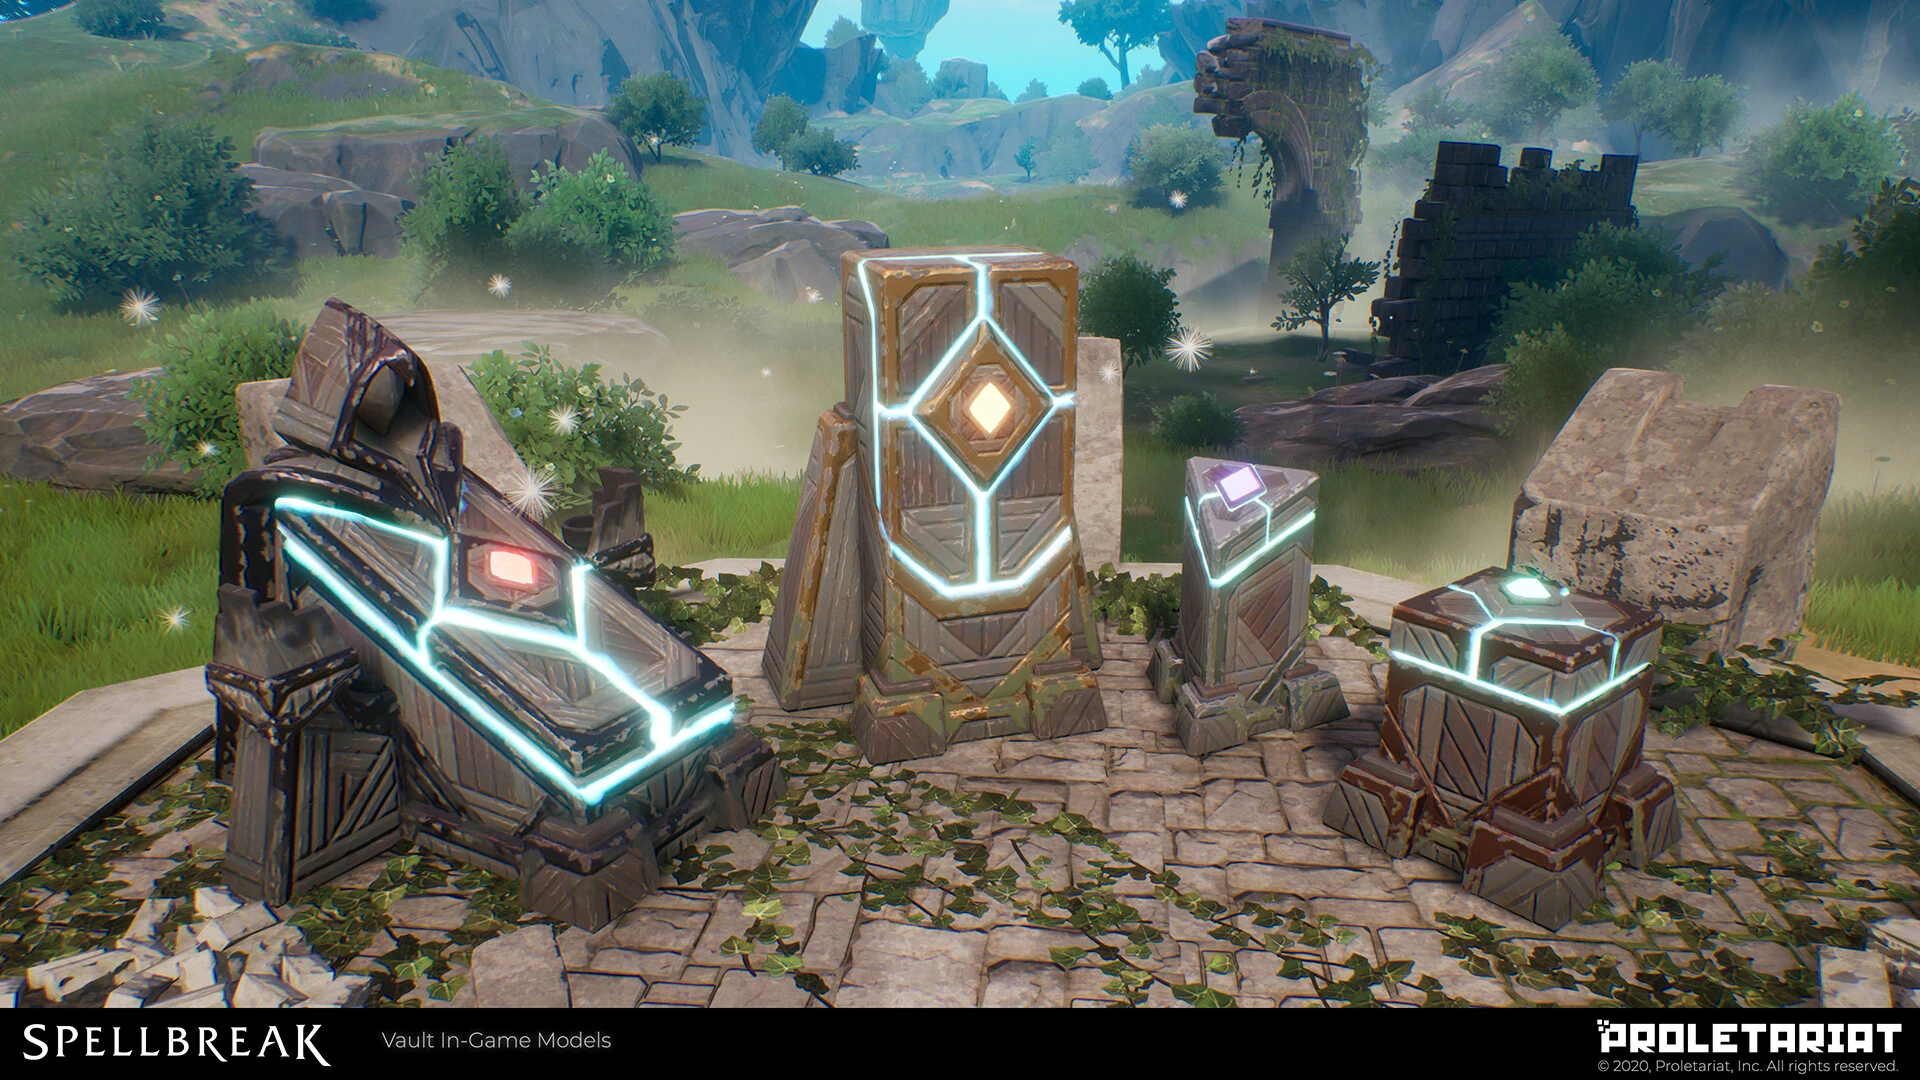
Chests
Equipment comes in 5 different tiers of rarity; Common, Uncommon, Rare, Epic and Legendary.
In Battle Royale, Common & Uncommon rarities of Gauntlets & other equipment can be found all across the Hollow Lands.
Higher rarities however are limited to Chests, with Legendary rarity being exclusive to ![]() Mana Vaults.
Mana Vaults.
![]() Mana Vaults spawn randomly across the map at match start and are indicated by the following icon:
Mana Vaults spawn randomly across the map at match start and are indicated by the following icon: ![]()
Additional ![]() Mana Vaults will spawn within a safe zone each time the Spellstorm fully encloses it.
Mana Vaults will spawn within a safe zone each time the Spellstorm fully encloses it.
Once activated, the vault will begin assembling over 20 seconds before opening. The assembly is audible to nearby players.
Since week 4 of Chapter 2, opening ![]() Epic Chests and
Epic Chests and ![]() Mana Vaults will trigger an ambush of hostile NPC Breakers.
Mana Vaults will trigger an ambush of hostile NPC Breakers.
| Chests | ||
|---|---|---|
| Icon | Name | Loot |

|
||

|
||

|
||

|
||

|
||
| Footnotes |
|---|
|
Amulets, Belts & Boots
Players start the game with baseline stat values that vary based on game mode (Battle Royale / Dominion):
These max values may be increased through Blessings or a variety of equipment listed below. Belts dropped from Chests refill the player's armor when equipped.
| Equipment | |||||||
|---|---|---|---|---|---|---|---|
| Icon | Type | Stat | Common | Uncommon | Rare | Epic | Legendary |
 |
Amulet | Max Mana | +10 | +20 | +30 | +40 | +50 |
 |
Belt | Max Armor | +20 | +40 | +60 | +80 | +100 |
 |
Boots | Run Speed | +1 | +2 | +3 | +4 | +5 |
The Merchant


In the Dominion game mode there are no Chests, Amulets, Belts or Boots. Instead, players get their loot by exchanging so-called ![]() Boon Gems at The Merchant.
Boon Gems at The Merchant.
Players start with and can store up to 3 Boon Gem charges. Charges fill up slowly over time, and faster as players exile or deal damage to enemy Breakers & Vowguards.
Boon Gems can be exchanged at the merchant for a Boon offer after recalling or getting exiled. Being exiled grants the player a Boon Gem charge if they don't have any.
At the beginning of a match, the merchant offers two rounds of three boon choices, consisting of random Common offhand Gauntlets & Runes respectively.
The merchant will then cycle through three different sets of boon choices between each purchase.
These Boon choices include Gauntlets, Runes and Blessings. All Boons offered are guaranteed to be one rarity level higher than what is equipped.
Boon Set 1:
- Option 1: Offhand Gauntlet Upgrade of a random element
- Option 2: Equipped Rune Upgrade
- Option 3: Class Gauntlet Upgrade OR a random Blessing
Boon Set 2:
- Option 1: Equipped Offhand Gauntlet Upgrade
- Option 2: Rune Upgrade of a random type
- Option 3: Class Gauntlet Upgrade OR a random Blessing
Boon Set 3:
- Option 1:
 Mana Blessing: +20 Max Mana
 - Option 2: Armor Blessing: +20 Max Armor
- Option 3: Speed Blessing: +3 Run Speed
Blessings max out at +100 Max Armor, +100 Max Mana, and +9 Run Speed.
Players have access to three rerolls per match. Rerolling cycles to the next Boon Set, with no repeats of prior choices.
Note: If a boon option is maxed out (Either equipment rarity or a Blessing) you will be offered a different option.
If you've maxed out all Blessings, Minor ![]() Mana Blessings &
Mana Blessings & ![]() Armor Blessings (+5 Mana / Armor) will be offered in their place indefinitely.
Armor Blessings (+5 Mana / Armor) will be offered in their place indefinitely.
Runes
Runes grant access to a third activated ability which provides non-damaging utility, primarily mobility.
Players have a max rune charge of 1 by default, and will refill a charge once the cooldown timer completes. The cooldown timer is paused while hovering.
Additionally, rune charges can only refill after use once the player has touched the ground or used ![]() Wind Surge,
Wind Surge, ![]() Firefly or
Firefly or ![]() Vanishing Mists.
Vanishing Mists.
| Runes | |||||||||
|---|---|---|---|---|---|---|---|---|---|
| Icon | Icon | Name | Description | Duration | Cooldown Based On Rarity | ||||
 |
Leap into the air in the direction you're moving. | ||||||||
 |
Quickly dash in the direction you're moving. | ||||||||
 |
Become Invisible for a duration and increase your Run Speed by 3. | ||||||||
 |
Become Invisible for a duration and quickly dash in the direction you're moving. | ||||||||
 |
Following a loud howl, increase your Run Speed by 4 and Outline your opponents. Reveals them through walls, terrain and Invisibility for the duration. (100 m) |
||||||||
 |
Launch high up into the air, then slowly descend down for a duration. Casting ends the descent. You must be grounded to use multiple charges. |
||||||||
 |
Take flight for a duration. Vertical flight speed is reduced by 40%. Is interrupted by collision or jumping. You must be grounded to use multiple charges. |
||||||||
 |
Teleport to target location after a short channel duration. Can move during channel. (60 m) | ||||||||
 |
Upon activation, place a ghost of your former self at your position. 4 seconds after activation, quickly rewind back in time to the ghost's position. Your health & armor are returned to the highest value recorded in the time frame. You will not rewind if you become disrupted during activation. During the rewind you are immune, truly invisible and cleansed of all Status Effects. You must be grounded to use multiple charges. |
||||||||
Consumables

Consumables grant the user a temporary regenerative buff or power-up after a short channel. Most consumables can be stacked in the same inventory slot.
Run Speed is reduced while channeling, but the player can crouch and remain Invisible during it. For more info see Channels.
They can be found throughout the Hollow Lands and drop from Vowguard NPCs.
| Consumables | ||||||
|---|---|---|---|---|---|---|
| Icon | Icon | Name | Rarity | Max Stack | Description | |
 |
Small Health Potion | Common | 6 | After drinking for 2 seconds, heals you for 15 health over 5 seconds. Drops in stacks of 2. | ||
 |
Health Potion | Uncommon | 2 | After drinking for 3 seconds, heals you for 25 health over 10 seconds. | ||
 |
Large Health Potion | Rare | 2 | After drinking for 6 seconds, heals you for 50 health over 10 seconds. | ||
 |
Small Armor Shard | Common | 6 | After consuming for 2 seconds, gives you 15 armor over 5 seconds. | ||
 |
Armor Shard | Uncommon | 2 | After consuming for 3 seconds, gives you 25 armor over 10 seconds. | ||
 |
Large Armor Shard | Rare | 2 | After consuming for 6 seconds, gives you 50 armor over 10 seconds. | ||
 |
Safeguard Potion | Epic | 2 | After drinking for 4 seconds, gives you 25 health and armor over 10 seconds. | ||
 |
Large Safeguard Potion | Legendary | 1 | After drinking for 6 seconds, gives you 50 health and armor over 10 seconds. | ||
 |
Knowledge Potion | Epic | 1 | After drinking for 3 seconds, gives you 2 bonus charges to your Rune and your Sorceries. | ||
| Spellbreak | Spellbreak |
|---|---|
| Gameplay • Game Modes • Spells & Sorceries • Equipment • Classes Cosmetics • Leagues • Progression • Talents • Class Strategies Chapters • Lore • Garrick's Journal • Status Effects • Build Library Concept Art • Founder Packs • Patch Notes • Archives |